Introduction
FL Studio is a powerful digital audio workstation (DAW) used by music producers, podcasters and beat‑makers around the world. Whether you’re recording vocals, guitar riffs or field recordings, you will eventually need to import those audio files into FL Studio for editing, arrangement and mixing. This guide explains how to import recorded audio into FL Studio using several methods so that you can quickly get creative. It also includes tips for working with audio clips and notes on which edition of FL Studio you’ll need.
Why importing audio matters
Recording outside of FL Studio is common when capturing vocals or live instruments. Importing those recordings allows you to:
- arrange and layer your own performances with software instruments;
- slice and warp recorded material for creative sampling;
- mix and process your recordings with FL Studio’s effects and automation;
- reuse recordings across multiple projects.
Requirements: choose the right edition
Not all versions of FL Studio support audio import. According to the FL Studio team, Audio Clips are available only in the Producer and Signature editions. The Fruity edition cannot import audio directly, but there is a workaround with third‑party samplers (explained later). If you plan on recording and importing vocals or instruments regularly, upgrade to the Producer edition or above so you can drag and drop audio clips and use editing tools like Edison and Slicex.
Method 1 – Import audio using an Audio Clip channel
The most straightforward way to bring a recording into FL Studio is by adding an Audio Clip channel. Audio Clips are special sampler channels designed to hold audio files in the playlist.
1.) Create a new project: Open FL Studio and start a blank project (File → New from Template → Minimal → Empty). A blank project helps you focus on the import process.
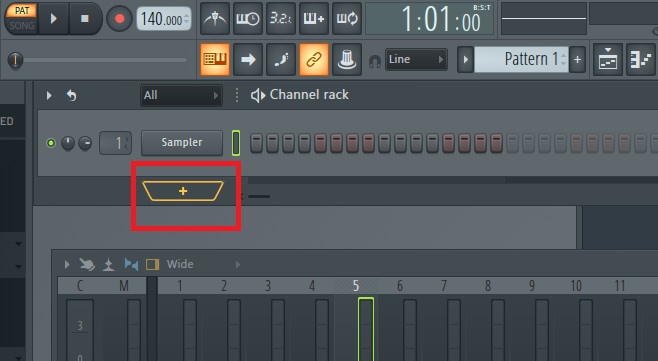
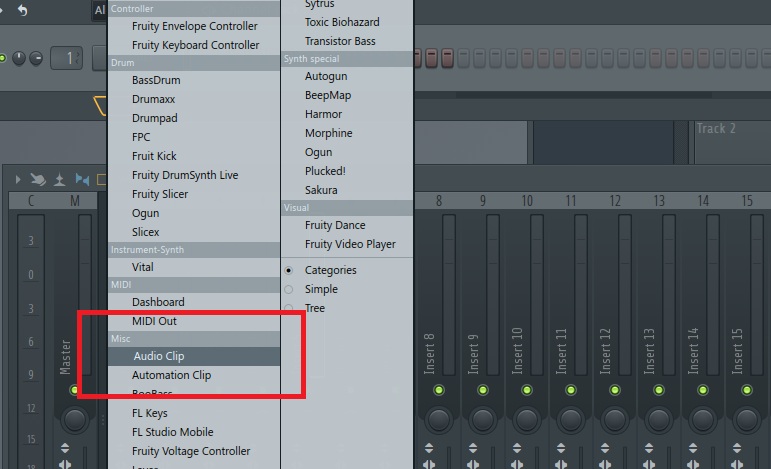
2.) Add an Audio Clip channel: In the Channel Rack, click the + button at the bottom and choose Misc → Audio Clip. This creates an empty Audio Clip channel.
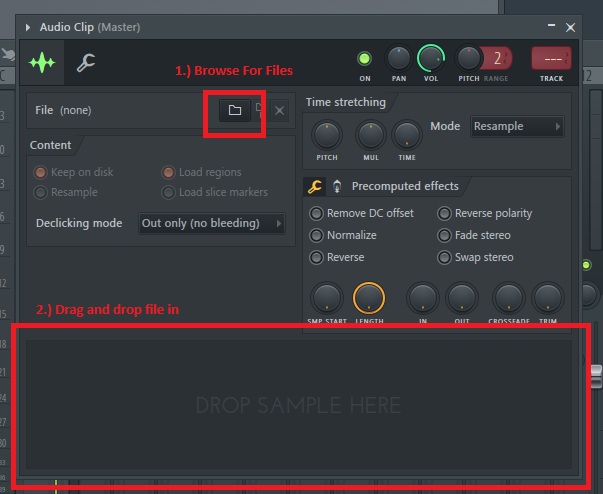
3.) Load your recording: Click the new Audio Clip channel to open its settings. Click the folder icon next to the File field to open a file‑browser or drag and drop the file into the “DROP SAMPLE HERE” box. Browse to your recorded audio and open it. FL Studio supports WAV, AIFF, FLAC, MP3, OGG and other common formats.
4.) Draw the clip into the playlist: With the Audio Clip selected, use the Brush tool and click in the Playlist to place the clip. You can click multiple times to create duplicate instances. Once placed, the clip appears as a waveform that you can move, slice, stretch or fade.
Tip: Audio Clips placed in the playlist have additional controls such as volume, pitch, reversing and crossfades. Double‑click a clip to access these properties or adjust them using the clip’s fade.
Method 2 – Drag & drop from your operating system (fastest)
If you already know where your recording is stored, you can import it via drag‑and‑drop without adding an Audio Clip manually. This is the fastest method once you have the Producer edition.
- Open File Explorer or Finder: Launch your system’s file manager.
- Resize windows: Resize the file manager so you can see FL Studio behind it.
- Drag the audio file: Locate your recording, click and hold the file, then drag it directly into FL Studio’s playlist area. FL Studio automatically creates an Audio Clip channel and places the clip in the playlist. This method is identical to the one above but saves time by skipping the file chooser.
This drag‑and‑drop technique also works from the FL Studio Browser (see Method 3) or from a desktop folder. As the FL Studio manual notes, dropping a sample on the playlist loads it as an Audio Clip, whereas dropping it on the Channel Rack creates a regular Sampler channel.
Method 3 – Import from the FL Studio Browser
FL Studio’s built‑in Browser can point to folders on your computer. Once configured, you can navigate to your recordings and drag them straight into the playlist.
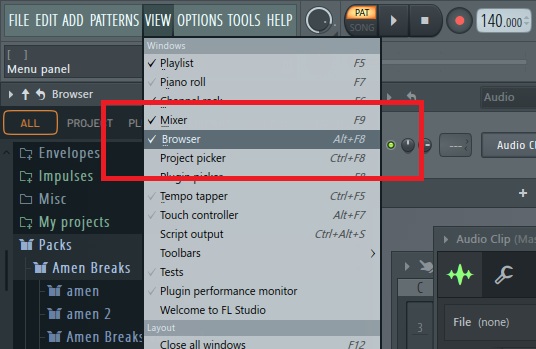
1.) Show the Browser: In FL Studio’s menu choose View → Show Browser so the left‑hand panel appears.
2.) Add your sample folder: Go to Options → File Settings and add the folder containing your recordings to the Browser extra search folders list. This makes the folder accessible inside FL Studio.
3.) Drag the recording into the playlist: Navigate to your folder in the Browser, select the audio file and drag it onto the playlist. FL Studio automatically creates an Audio Clip channel for you.
This method is useful when you maintain a dedicated sample library for drums, loops or vocal takes; FL Studio remembers your folder settings across sessions.
Method 4 – Use Slicex for creative sampling
Slicex is a sampler plugin that excels at slicing loops and samples. You can import a recording into Slicex to chop it into pieces or apply advanced processing before sending it to the playlist. This method is helpful if you plan to repurpose parts of your recording (e.g., vocal chops).
1.) Open the Channel Rack (F6) and search for Slicex: Use the search bar at the top of FL Studio’s Browser to find “Slicex,” then drag the plugin into the Channel Rack.
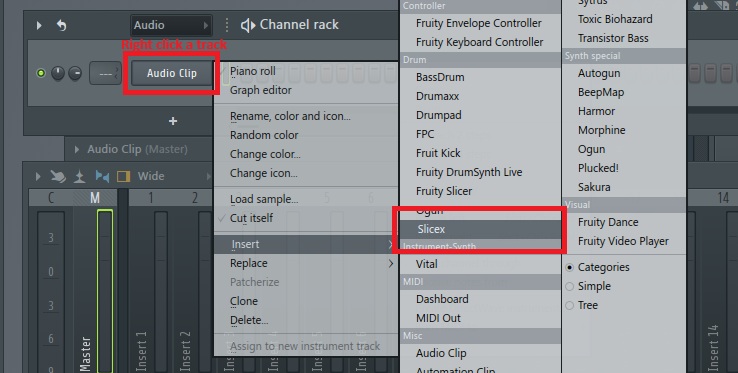
2.) Open Slicex: Click the Slicex channel to bring up its interface.
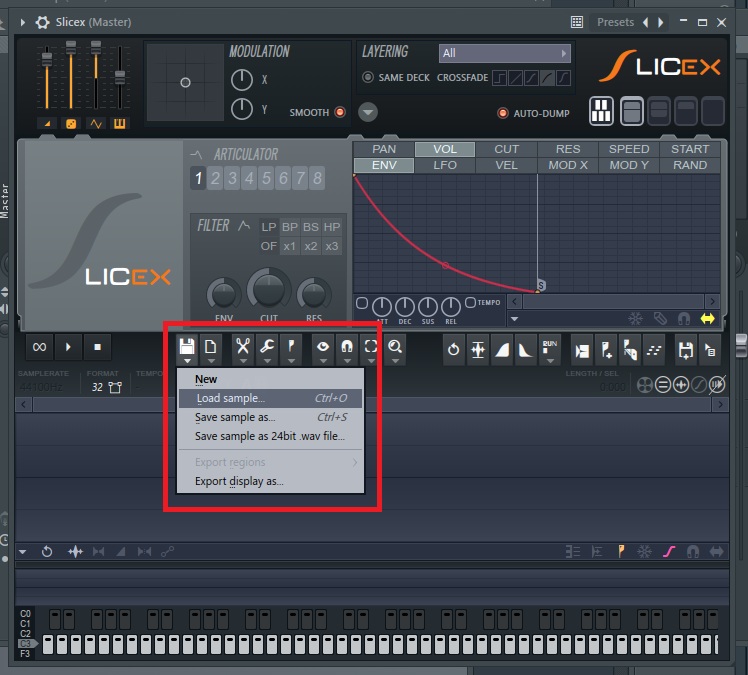
3.) Import the audio: Drag your recording directly into the Slicex window, or click the floppy‑disk icon and choose Load Sample to open it from your file system. Slicex will display the waveform and automatically slice it according to transient detection settings.
4.) Send the sample to the playlist: Click the import button in Slicex and drag the file into the playlist. A new Audio Clip is created, retaining any slices or edits you made in Slicex.
Method 5 – Use Edison for editing before import
Edison is an audio editor and recorder built into FL Studio. If your recorded audio needs trimming, noise removal or other edits before placing it in the playlist, Edison makes that possible.
- Add Edison: Bring up the Channel Rack (F6), search for “Edison,” then drag it into the Channel Rack.
- Load the recording: Open Edison and either drag your audio file into the window or click the file‑folder icon (or use Command + O) to browse and load the file.
- Edit the audio: Use Edison’s tools to trim silence, normalize, de‑noise or add fades. When ready, click the Import button (a small arrow) to send the edited clip to the playlist. The clip appears as an Audio Clip in the playlist.
Edison is ideal for preparing vocals or instruments before arranging them. It can also record audio directly from your microphone; assign a mixer track input, open Edison and hit the Record button.
Method 6 – Workaround for Fruity edition using a third‑party sampler (optional)
The Fruity edition does not allow you to import Audio Clips directly. A workaround is to use a third‑party sampler plugin such as AUSampler or another sampler VST. The process is similar to using Slicex or Edison: add the sampler to the Channel Rack, load your audio file within the plugin, then draw notes in the piano roll or export the sample to the playlist. While this method can work, it’s less efficient than upgrading to the Producer edition.
Additional tips for working with recorded audio
- Understand Audio Clip vs. Sampler channel: Dropping a file onto the playlist creates an Audio Clip; dropping it on the Channel Rack creates a Sampler channel. Use Audio Clips for arranging whole recordings and Sampler channels for one‑shot samples triggered by the Step Sequencer.
- Use clip editing tools: Audio Clips have fade handles and options for crossfades, pitch shifting and reversing. Right‑click the wave icon in the playlist to access options such as automatic crossfades and snapping fade handles.
- Record directly into FL Studio: To record new audio instead of importing, link a Playlist track to a Mixer track, select the appropriate input and press Record. You can set the record destination using the disc icon at the base of the track. The recorded clip appears immediately in the playlist.
- Organize your files: Keep a dedicated folder for recordings and add it to the Browser’s extra search folders. Name your takes clearly and include tempo or key information if relevant.
- Check sample rate and bit depth: Ensure your recording’s sample rate matches your project settings to avoid pitch issues when importing. FL Studio can resample automatically, but matching rates simplifies your workflow.
Comparison of import methods
| Method | Key steps (keywords) | Best for | Requirements |
|---|---|---|---|
| Audio Clip channel | Add Audio Clip via Channel Rack → open file → draw in playlist | Precise placement of full takes; control over clip properties | Producer or Signature edition |
| Drag & drop | Drag file from Explorer/Finder into playlist | Fastest import for any audio file | Producer or Signature edition |
| Browser drag & drop | Add folder to Browser → drag file into playlist | Accessing a large library within FL Studio | Producer or Signature edition |
| Slicex | Add Slicex plugin → drag or load sample → import to playlist | Slicing loops, creating chops and creative sampling | Producer or Signature edition with Slicex plugin |
| Edison | Add Edison plugin → drag or load sample → edit → import | Cleaning audio, trimming, normalizing before arrangement | Producer or Signature edition with Edison |
| Third‑party sampler | Add sampler → load sample → trigger via piano roll → export | Fruity edition workaround; sampling via external plugins | Any edition with supported plugin |
Conclusion
Importing recorded audio into FL Studio is an essential skill for anyone working with vocals, instruments or field recordings. Whether you use the built‑in Audio Clip channel, drag and drop directly from your file system, or leverage tools like Slicex and Edison for deeper editing, FL Studio offers flexible workflows. Remember to upgrade to the Producer edition if you need full audio‑import capabilities, and organize your recordings so they’re always at your fingertips. With these techniques, you can seamlessly blend analog performances with digital production and unlock new creative possibilities.